
My design goals are simple, construct a "cost effective" passive/active monitor style speaker.
SELECTED DRIVERS
Driver Selection Parameters:
- Actual efficiency in the 90's at 1w/1m (2.83v @ 8ohms) = 90dm 1w/1m CHECK
- Drivers must be efficient and high powered enough to deliver substantial SPL = CHECK design capable of delivering 122db at 40hz @ 250watts, or 107db at 30hz @ 250watts
- Cost effective but highly transparent drivers = The SB Acoustic and Seas drivers are well regarded drivers and offer excellent response curves CHECK
- Cabinet size must be Wife friendly = Cabinets are manageable with an external volume of 110litres CHECK
- Driers must offer smooth roll off response slopes either side of crossover points = CHECK
- The speaker must sound great = TIME WILL TELL
- Speakers must be full range = -3db @ 33hz. My estimates have the 12.5.1 performing relatively flat to circa 25hz in room.
Model: SB29RDC-C00-4
Manufacturer: SB Acoustics
Manufacturer: SB Acoustics
Purchased from: http://www.essentialaudio.com.au/
FYI Scott (from essential audio) is fantastic to deal with, great service, very good prices.
Highly recommended A+
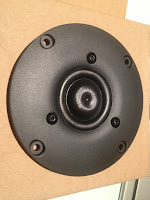
Efficiency: 93DB @ 2.83V @ 4ohms = circa 90db @ 8ohms 2.83v / 1w/1m
Overview:
A brilliant HF driver, equivalent to many Scanspeak drivers 6x its price.
Check out what zaph thinks about this driver! Highly rated
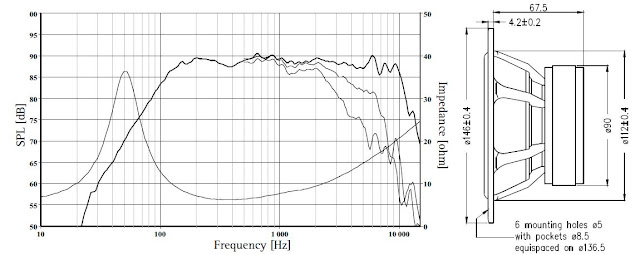
FREQUENCY CHART
MID FREQUENCY
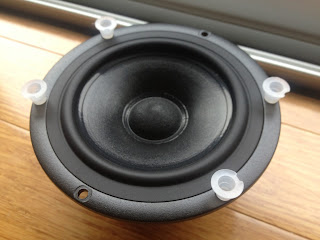
Description: 5 inch Seas Paper Mid range Model: SEAS H1262 MCA15RCY
Manufacturer: Seas (Prestige Range)
Purchased from: http://aranmaracoustics.com.au/
Give John a call, he is always happy to help.
Cost: Circa $88ex each
Efficiency: 89.5db @ 2.83v @ 8ohms
Overview:
As used in the Troels Gravesen Poor Man
Super smooth and efficient. A perfect match for the HF and Low freq drivers.
Crossover range will be circa 300 - 3000hz
Fantastic roll off response, with a woven dust cap for ultra low breakup.
LOW FREQUENCY
Description: 12 inch SB Acoustic Woofer
Model: SB34NRXL75-8
Manufacturer: SB Acoustics
Cost: $255inc each
Efficiency: 91db @ 2.83v @ 8ohms
Overview:
Super smooth right up to 600hz....... with controllable cone breakup starting at 1.5khz, well out of the crossover range.
The SB Acoustic SB34NRXL75-8 is vented alignment optimised, unlike the 6 ohm version which is suited to sealed alignments, a perfect match for a 12db crossover at circa 300-400hz into the Seas MCA15RCY mid range.


EARLY ENCLOSURE MODELLING
The design goal here was to keep the enclosure as compact as possible, without compromising too much on low end extension. Internal cabinet volume has been 'optimised' to provide the flattest possible response above frequency roll off.
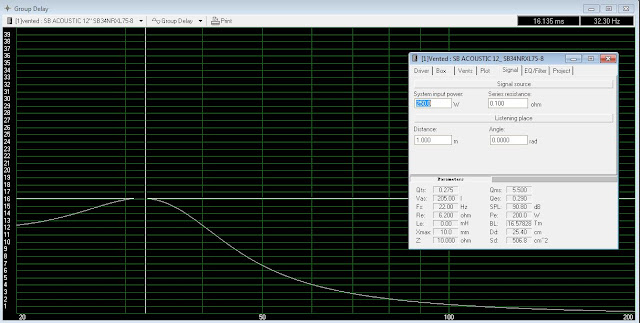
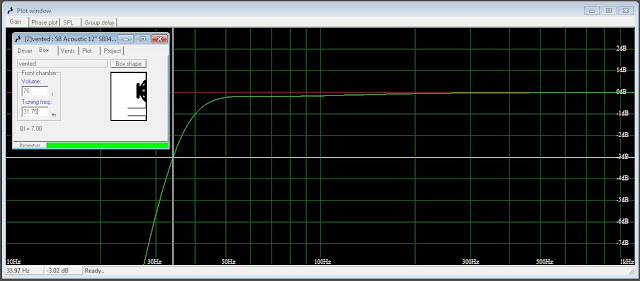
The end result of computer modelling yields an internal cabinet volume approximately 15 litres larger the WINISD's calculation for optimal QB3-Quasi Butterworth alignment. Circa 75 litres for the SB34NRXL75-8 low frequency driver, 33.5hz @ -3db. Its worth noting a larger volume (up to 90litres) provides only slightly more low end response 30hz @ -3db point, however the transfer function develops a dip from 50-200hz circa 0.5db, group delay also increases by 3ms at 30hz.
Vents/Ports have been modelled as dual 4inch flared ports keep air velocity below 15m/s for non audible operation down to 20hz.
Initial dimensions are as follows:
BOX OUTER DIMENSIONS
HEIGHT 770MM
WIDTH 400MM
DEPTH 450MM
INNER DIMENSION
110.6 LITRE VOLUME
HEIGHT 734MM
WIDTH 364MM
VOLUME
CROSSOVER BOXES (300X 300 X 80) 7.2 LITRES
DUAL 4INCH PORTS WOOFER 8.8 LITRES
BAFFLES VERTICAL 3.6 LITRES
BAFFLES HORIZONTAL 4.8 LITRES
WOOFER DISPLACEMENT 1.5 LITRES
TWEETER ENCLOSURE 1 LITRE
MID ENCLOSURE 6.3 LITRES
TOTAL SUBTRACTIONS 33.2 LITRES
~ 75.8 LITRES PERFECT FOR THE SB34NRXL75-8
ENCLOSURE MODELLING
Below I have shown the WINISD functions for the SB Acoustic
12 inch SB Acoustic Woofer - SB34NRXL75-8...
TRANSFER FUNCTION
-3db @ 33.5HZ

WOOFER EXCURSION
9.8mm @ 250 WATT @ 45hz
Modelling suggests @ 300watts 10.7mm in excursion is seen, in this 75litre alignment.


Well below the suggest maximum of 20m/s...
Port Dimensions are modelled @ 4 inch diameter x 2, 56/58cm long @ tuning of 32hz.
Port volume is 8.8 litres.
GROUP DELAY
16ms @ 32Hz Peak
Grizzly
------------------------------------------------------------------------------------------------
Bring on the holidays!
I finally had some free time to instigate the cabinet construction for my 12.5.1 speaker. A task I have been wanting to do for sometime. The carcass and all bracing has been cut and 'test assembled' (without glue) to ensure everything goes together correctly.
During final port modelling (Using WinISD) I was struggling to find an acceptable balance between low port air velocity and a high 1st freq resonance with a traditional twin 102mm pipe solution. The twin 102mm port solution provided great air velocities, 17m/s at a full 200watts, but the 1st resonance freq of the port(s) was too close within the woofers rendering spectrum. As stated previously utilising a slot port provided more opportunity/scope to achieve this balance, as 'core' sizing is completely customisable in measurements of millimetres.
The slot port solution has the added benefit of providing increased cabinet strength and rigidity when compared to a traditional circular port solution, which does little for cabinet structure.
---------------------------------------------------------------------------------------------
CUTTING BAFFLES
So now that I had the speaker carcass and major braces cut, the next step was to 'window' cut all the baffles ready for driver installation.
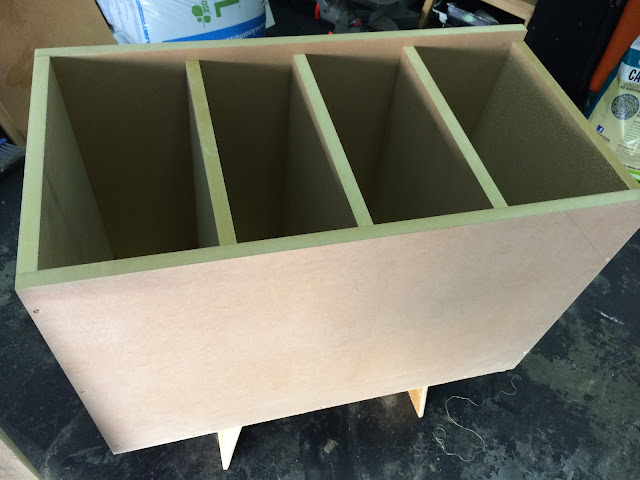
Understanding my end goal is to create speaker cabinets which are inert as possible, you will see I continued the use of 18mm MDF timber for the construction of all horizontal and vertical support braces used internally of the speaker carcass. On average horizontal braces are to be fixed at 100-150mm intervals.
This spacing strategy seems to provide a decent compromise between cabinet rigidity (low resonance) and going over board. I must admit though, the cabinets were becoming seriously heavy!! and once complete will require 2 strong people to lift into place.
In addition to the horizontal baffling, I cut 50mm deep vertical braces (6 per section, or 3 per wall) to reinforce the non reinforced sections of the side walls between the large horizontal braces. My theory here (based on my experience with my subwoofer build) was the "timber ribbing" would help make the unsupported wall sections inert. From what I could tell it was a good strategy, a quick knuckle test delivers a solid thud.. even without final fixing!
WOOFER BRACES
CUTTING BAFFLES
So now that I had the speaker carcass and major braces cut, the next step was to 'window' cut all the baffles ready for driver installation.
Understanding my end goal is to create speaker cabinets which are inert as possible, you will see I continued the use of 18mm MDF timber for the construction of all horizontal and vertical support braces used internally of the speaker carcass. On average horizontal braces are to be fixed at 100-150mm intervals.
This spacing strategy seems to provide a decent compromise between cabinet rigidity (low resonance) and going over board. I must admit though, the cabinets were becoming seriously heavy!! and once complete will require 2 strong people to lift into place.
In addition to the horizontal baffling, I cut 50mm deep vertical braces (6 per section, or 3 per wall) to reinforce the non reinforced sections of the side walls between the large horizontal braces. My theory here (based on my experience with my subwoofer build) was the "timber ribbing" would help make the unsupported wall sections inert. From what I could tell it was a good strategy, a quick knuckle test delivers a solid thud.. even without final fixing!
-----------------------------------------------------------------------MID SECTION BAFFLE CUTTING
All cabinet baffling as covered in my last speaker post has been cut from 18mm MDF, the strategy and focus is to create an speaker cabinet which is inert and as resonance free as possible.
The mid section braces double as enclosure walls for the mid driver cabinet. If you refer to the adjacent photo you can see the mid section outline drawn on the MDF in pencil. <<
Currently all braces and sections are sitting unsupported in place. I am hoping once these sections are glued and screwed into place, the cabinet should be extremely inert and resonance free.
MID CABINET PORT
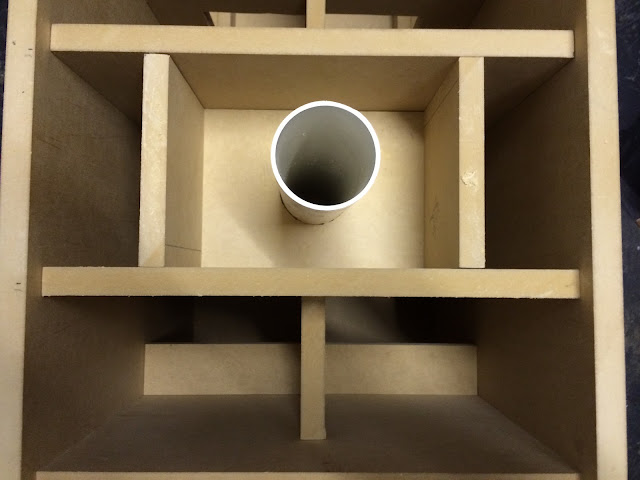
In the time I had available, I also managed to cut the mid port into the mid driver cabinet rear wall. To complete the mid driver port installation, I need to orientate and position the PVC port in place and cut an opposing hole into the rear wall of the speaker. This will allow the port to pass through the rear wall of the speaker cabinet.
This task will be instigated once the cabinet is permanently glued and screwed together. I will then route both port exits into the mid cabinet interior and on the rear exterior wall of the speaker cabinet.
See below some pictures of the work completed today......
WHAT THE NEXT STEP
Next, I need to complete a full cabinet disassemble, ready for a permanent assembly using glue and screws. This stage will include the installation of the small ribbing braces which I covered in the last speaker blog post.
FINAL BOX CALCULATIONS
Effective Cone Diameter = 80 mm
Mounting Depth = 67.5 mm
One-way, Linear Excursion (Xmax) = 1.7 mm
Magnet Diameter = 90 mm
Magnet Height = 27 mm
Front Baffle Thickness = .75 in
Flush Mount = Yes
Once all the numbers are punched in, the calculator does the hard work and produces the magic displacement figure....... The software provides a SEAS displacement volume of 0.22 litres.
So taking my 'asbuilt' mid cabinet volume of 3.192 litres and subtracting 0.22 litres driver displacement provides me with an overall net mid cabinet volume of 2.97 litres... perfect!! and in line with the modelling provided by win ISD.
WINISD MODELLING @ 2.97 litres
WOOFER DISPLACEMENT
Effective Cone Diameter = 260 mm
Mounting Depth = 146 mm
One-way, Linear Excursion (Xmax) = 10 mm
Magnet Diameter = 180 mm
Magnet Height = 62 mm
Front Baffle Thickness = .75 in
Flush Mount = Yes
The displacement calculator in this instance, spits out 2.47 litres displacement.
OK, so now that I have the displacement figures for both the mid and woofer, I can reconcile the volume of the main cabinet. You will note, I did not measure the tweeter displacement, because its net displaced volume is negligible.
ACTUAL INTERNAL CABINET VOLUME
Internal cabinet volume..........................106.7 litres
VOLUME REDUCTIONS
Slot Port (54x344x325mm)......................6 litres (outside dimensions)
Woofer Displacement...............................2.8 litres
Mid Enclosure..........................................4.14 litres
Mid Port....................................................7.8 litres
Tweeter enclosure .....................................0.75 litres each
Horizontal braces.....................................circa 5-6 litres
Vertical braces (There are 3 types)
Type 1 2 x 115x274x18mm....................1.134 litres total
Type 2 3 x 36x18x344mm......................0.67 litres total
Type 3 1 x 104x18x268mm....................0.5 litres
Type 4 1 x Woofer 18mm fixing brace behind cutout ................1 litre
So to calculate a final working volume, I now need to take overall cabinet volume and subtract all calculated/known reductions. (106.7 - 30.794) = circa 75.9 litres, with extras I anticipate total usable volume will be 75 litres exactly.
Just for consistency I have remodeled the SB acoustic 12inch.... based on the above 76 litre net enclosure volume calculation. As expected the plot is essentially identical to the 75 litre plot completed during the cabinet design phase. -3db is 34hz.... which is a good thing ;)
SO WHAT DOES ALL THIS MEAN?
It simply means my build thus far has been successful. I can now mount the speaker baffle boards ready for driver population. Here's a few shots of the speakers glued and screwed.
The cabinets are only missing the front baffles boards, mid PVC port and slot boards.....plus termination hardware of course.
---------------------------------------------------------------------------
FINAL POST
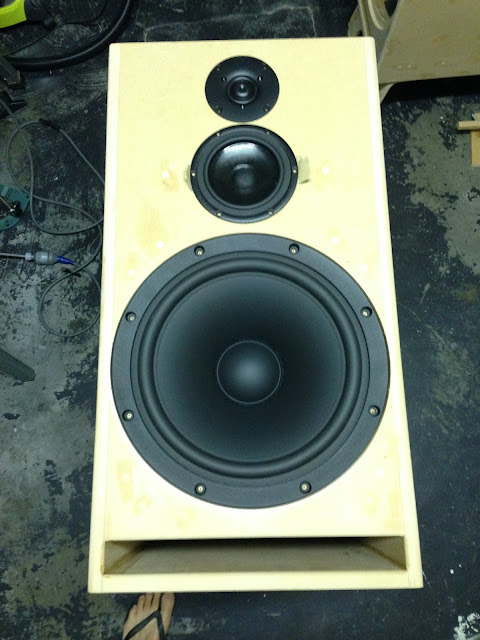
I must say I am actually quite proud of myself looking at the completed speaker. The 12.5.1 is my first DIY speaker active or passive, and the cabinet finish is excellent especially considering my minimal speaker building knowledge, wood-working skills and the overall monetary investment made.
Would I have done things differently if I had my time again? Sure a few.....
It doesn't sound as good as I would have liked, but you only learn from experience.
In hind sight the mid enclosure should have been larger, and the enclosure volume for the bass driver should have also been larger to provide better extension.
BUILD INVESTMENT
My total investment was $800inc in drivers, $60inc in MDF timber, probably $150 in misc items and $200inc in Symetrix DSP All up I spent about roughly $1300inc gst + a decent whack of my time.
BUILD PICTURES














Hi Nathan,
ReplyDeleteThe frequencies produced by the SB acoustics woofer in this speaker alignment are up to 300hz+ depending on the electronic crossover implemented, I.e. 6db, 12db, 24db, 48db.
Its typically agreed, bass frequencies below 80hz are not easily located and are omni-directional.
This speaker alignment sees the woofer producing frequencies much higher than subwoofer frequencies... I.e. >+80hz. as such I would not recommend firing a woofer vertically up if it is to reproduce frequencies above 80hz.
You will be missing considerable acoustic information.
My 2 cents
Hi,
ReplyDeleteI am motivated with your LS design and keep serious interest to make a similar L.S Design. Let me know if I can go with Sealed enclosure design by using 12 inch woofer from SB acoustics (SB Acoustics SB34NRX75-6 12" woofer).
Can I make 3 Way Monitor design in a sealed enclosure by using your enclosure
design? I like deep extended Bass response for LS and thus opted for 12 in drivers.
Kindly help and advise.
Regards,
Sam
Just wanted to say this is a really cool project, I like it. The ports are tuned around 33 Hz? You commented going to 90 liters made a kind of dip or something; the larger volume would probably need a lower port tuning to smooth things out. The -3 dB point would probably move up some, but the more significant -6 and -10 dB outputs increase.
ReplyDeleteActually the curve for that shows the SB 15 almost perfectly omnidirectional up to 1000 Hz, and hardly directional until 2000 Hz. (Very impressive for that size woofer!) So from that point of view it's fine to put the woofer on the top, on the side, even the back. However, with the low 300 Hz crossover, the wavelength is like 1.15 meters. This will make some phase shift which might necessitate crossover adjustment. Really this would need tweaking with some actual measurement but I don't think should be a fatal problem. Woofer-on-the-side could considerably slim the cabinet BUT the cabinet then must get deeper and/or taller to compensate, and care must be taken about the port size (might need 2 slot ports, top and bottom, or a vertical slot port along the back). Or change to sealed if less bass is OK.
ReplyDeleteA great project. I would like to run it, so I can see the filter scheme
ReplyDeleteFrom Chris M. Very nice build. My question relates to your final comments-In hind sight the mid enclosure should have been larger, and the enclosure volume for the bass driver should have also been larger to provide better extension. I have looked at the SB 12 inch 6 ohm and 8 ohm versions. I heard the 6 ohm at the Newport Show and was unimpressed. The 8 ohm large magnet version looks to be a totally different animal. If I take your comment correctly you feel that the 90 liter cabinet is preferred over the 75 liter cabinet. Do you still stand by that and what is your overall impression of the bass performance? I know that the sound wasn't quite what you had hopped it to be but that is why we all keep building. I have been building for 40 plus years and I hope that this will not be your last project. Take what you have learned and build on it (bad pun).
ReplyDeleteWhat the heck do each one of those weigh???
ReplyDelete